VS Code extension for Serverless Workflow editor
The VS Code extension for the Serverless Workflow editor enables you to view and edit CNCF Serverless Workflow specification files in your local projects.
This document describes how to install and use the VS Code extension for Serverless Workflow editor, along with how to load OpenAPI files using the extension.
Installing the VS Code Extension for Serverless Workflow editor
Using the VS Code extension for Serverless Workflow editor, enables you to view and edit the workflow specification files in your local projects.
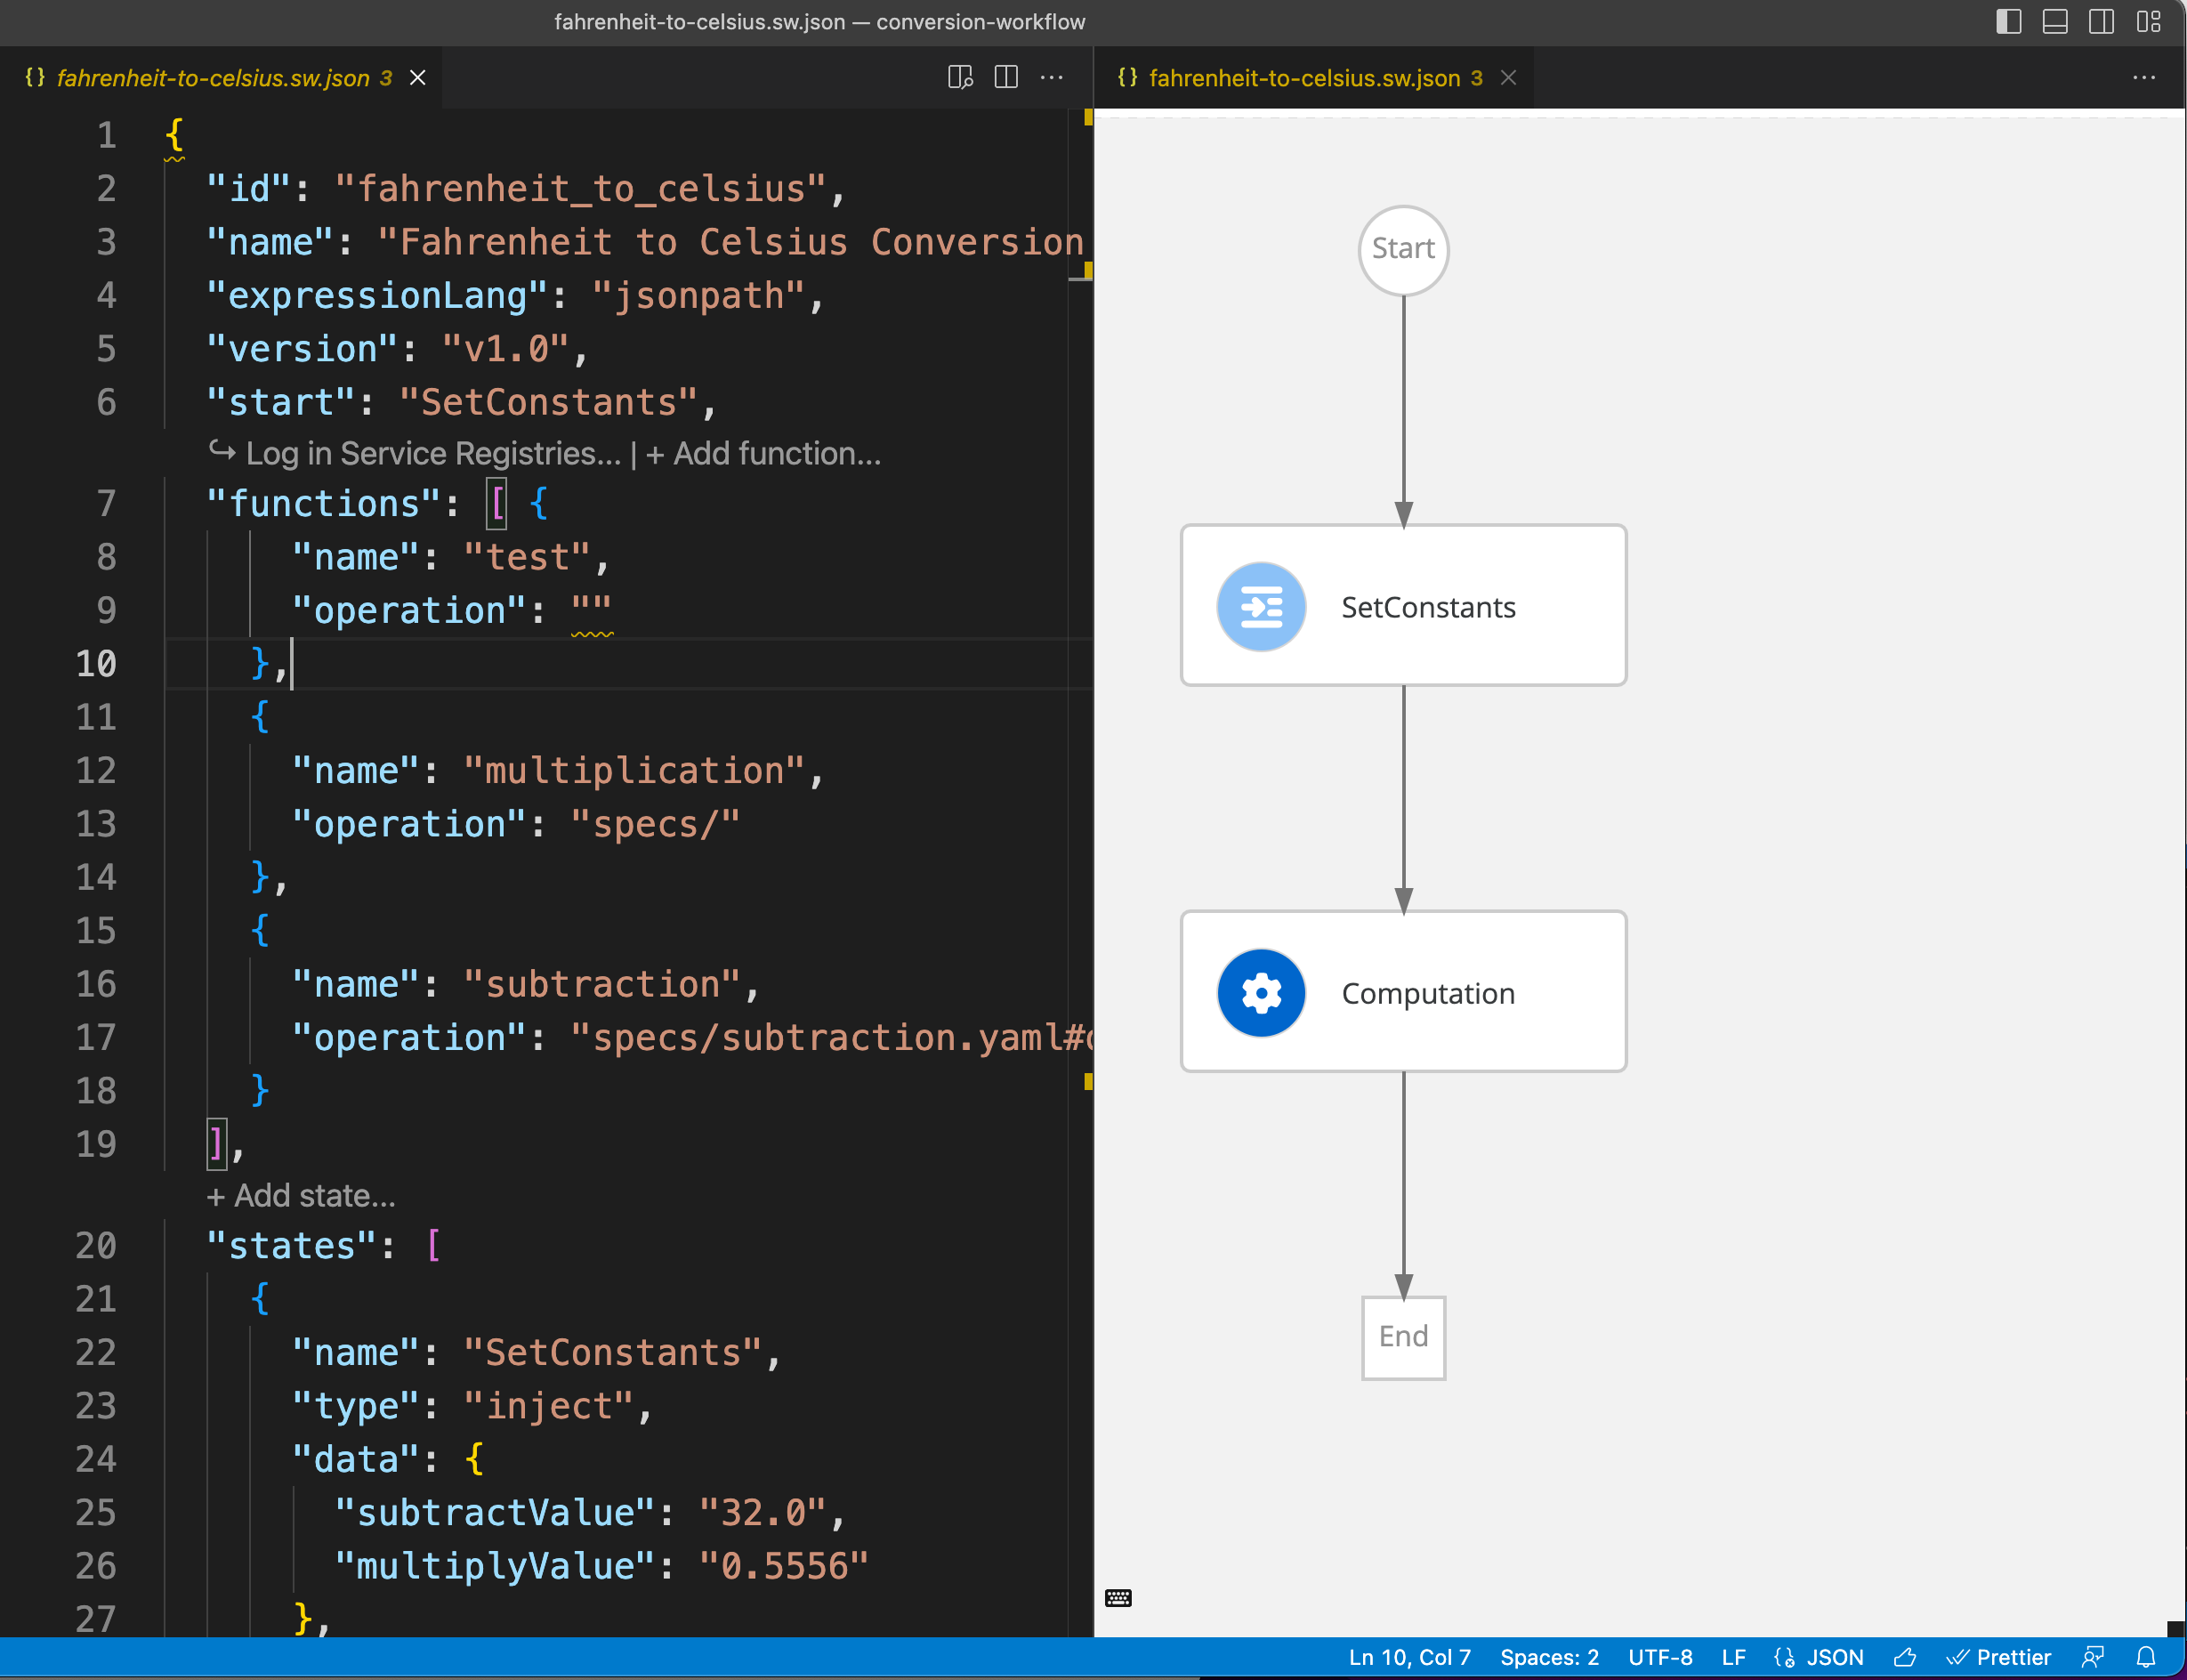
-
Visual Studio Code 1.67.0 or later is installed.
-
You can install the VS Code extension for Serverless Workflow editor using one of the following methods:
-
Go to Visual Studio Marketplace: Go to KIE Serverless Workflow Editor extension page in Visual Studio Marketplace and click Install.
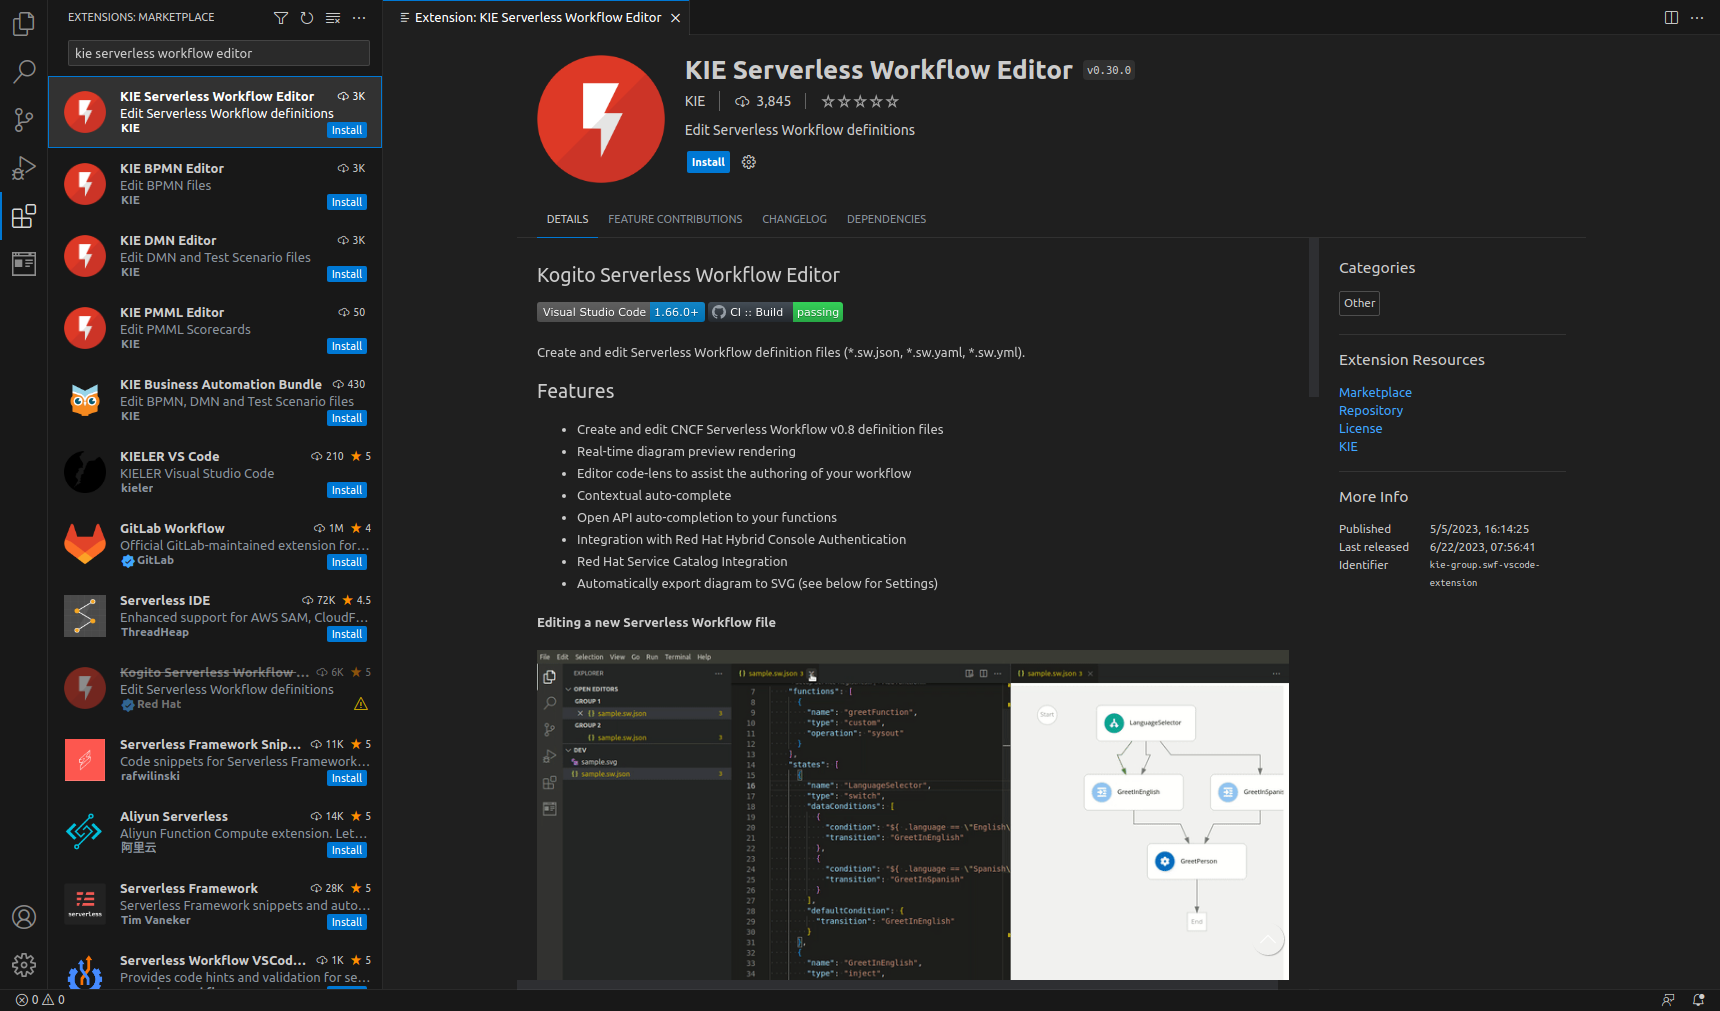 Figure 2. KIE Serverless Workflow Editor in Visual Studio Marketplace
 -
Download VSIX file:
-
Download the latest SonataFlow VS Code extension VSIX file from the kie-tools releases page in GitHub.
-
Click Install from VSIX option from the extensions menu and install the
serverless_workflow_vscode_extension_VERSION.vsixfile in VS Code.
 Figure 3. Install VS Code extension using VSIX
 -
-
-
Once installation is complete, you can create a workflow file or open an existing workflow file in VS Code.
When you open a workflow file, VS Code uses the extension automatically.
Features in Serverless Workflow editor
The Serverless Workflow editor contains the following main features:
-
Reload diagram dynamically: In the Serverless Workflow editor, when you make a change in the code editor, the workflow diagram updates automatically.
-
SVG generation: In the Serverless Workflow editor, you can save a workflow diagram as
.svgfile in the workspace. -
Auto-completion based on the context: The Serverless Workflow editor contains the capability of auto-completing the code based on the context.
The Serverless Workflow VS Code extension parses the OpenAPI specification files and provides a list of function definitions in the auto-complete dialog box.
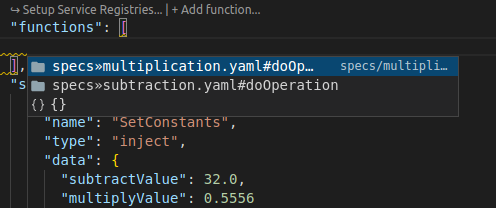 Figure 4. Function definition in auto-complete dialog box
Once you select an option in the auto-complete dialog box, a function definition is added to the functions array with proper settings as shown in the following example:
 Figure 5. Example of function definition object
When the function definition is added, the function is available for auto-completion in the function reference section as shown in the following example:
 Figure 6. Example of a function reference
Once you select an option from the auto-complete dialog box, a function reference is added with proper reference name and attributes.
-
Validation: The Serverless Workflow editor performs validation on the workflow files and provides an error-free experience.
Supported commands in Serverless Workflow VS Code extension
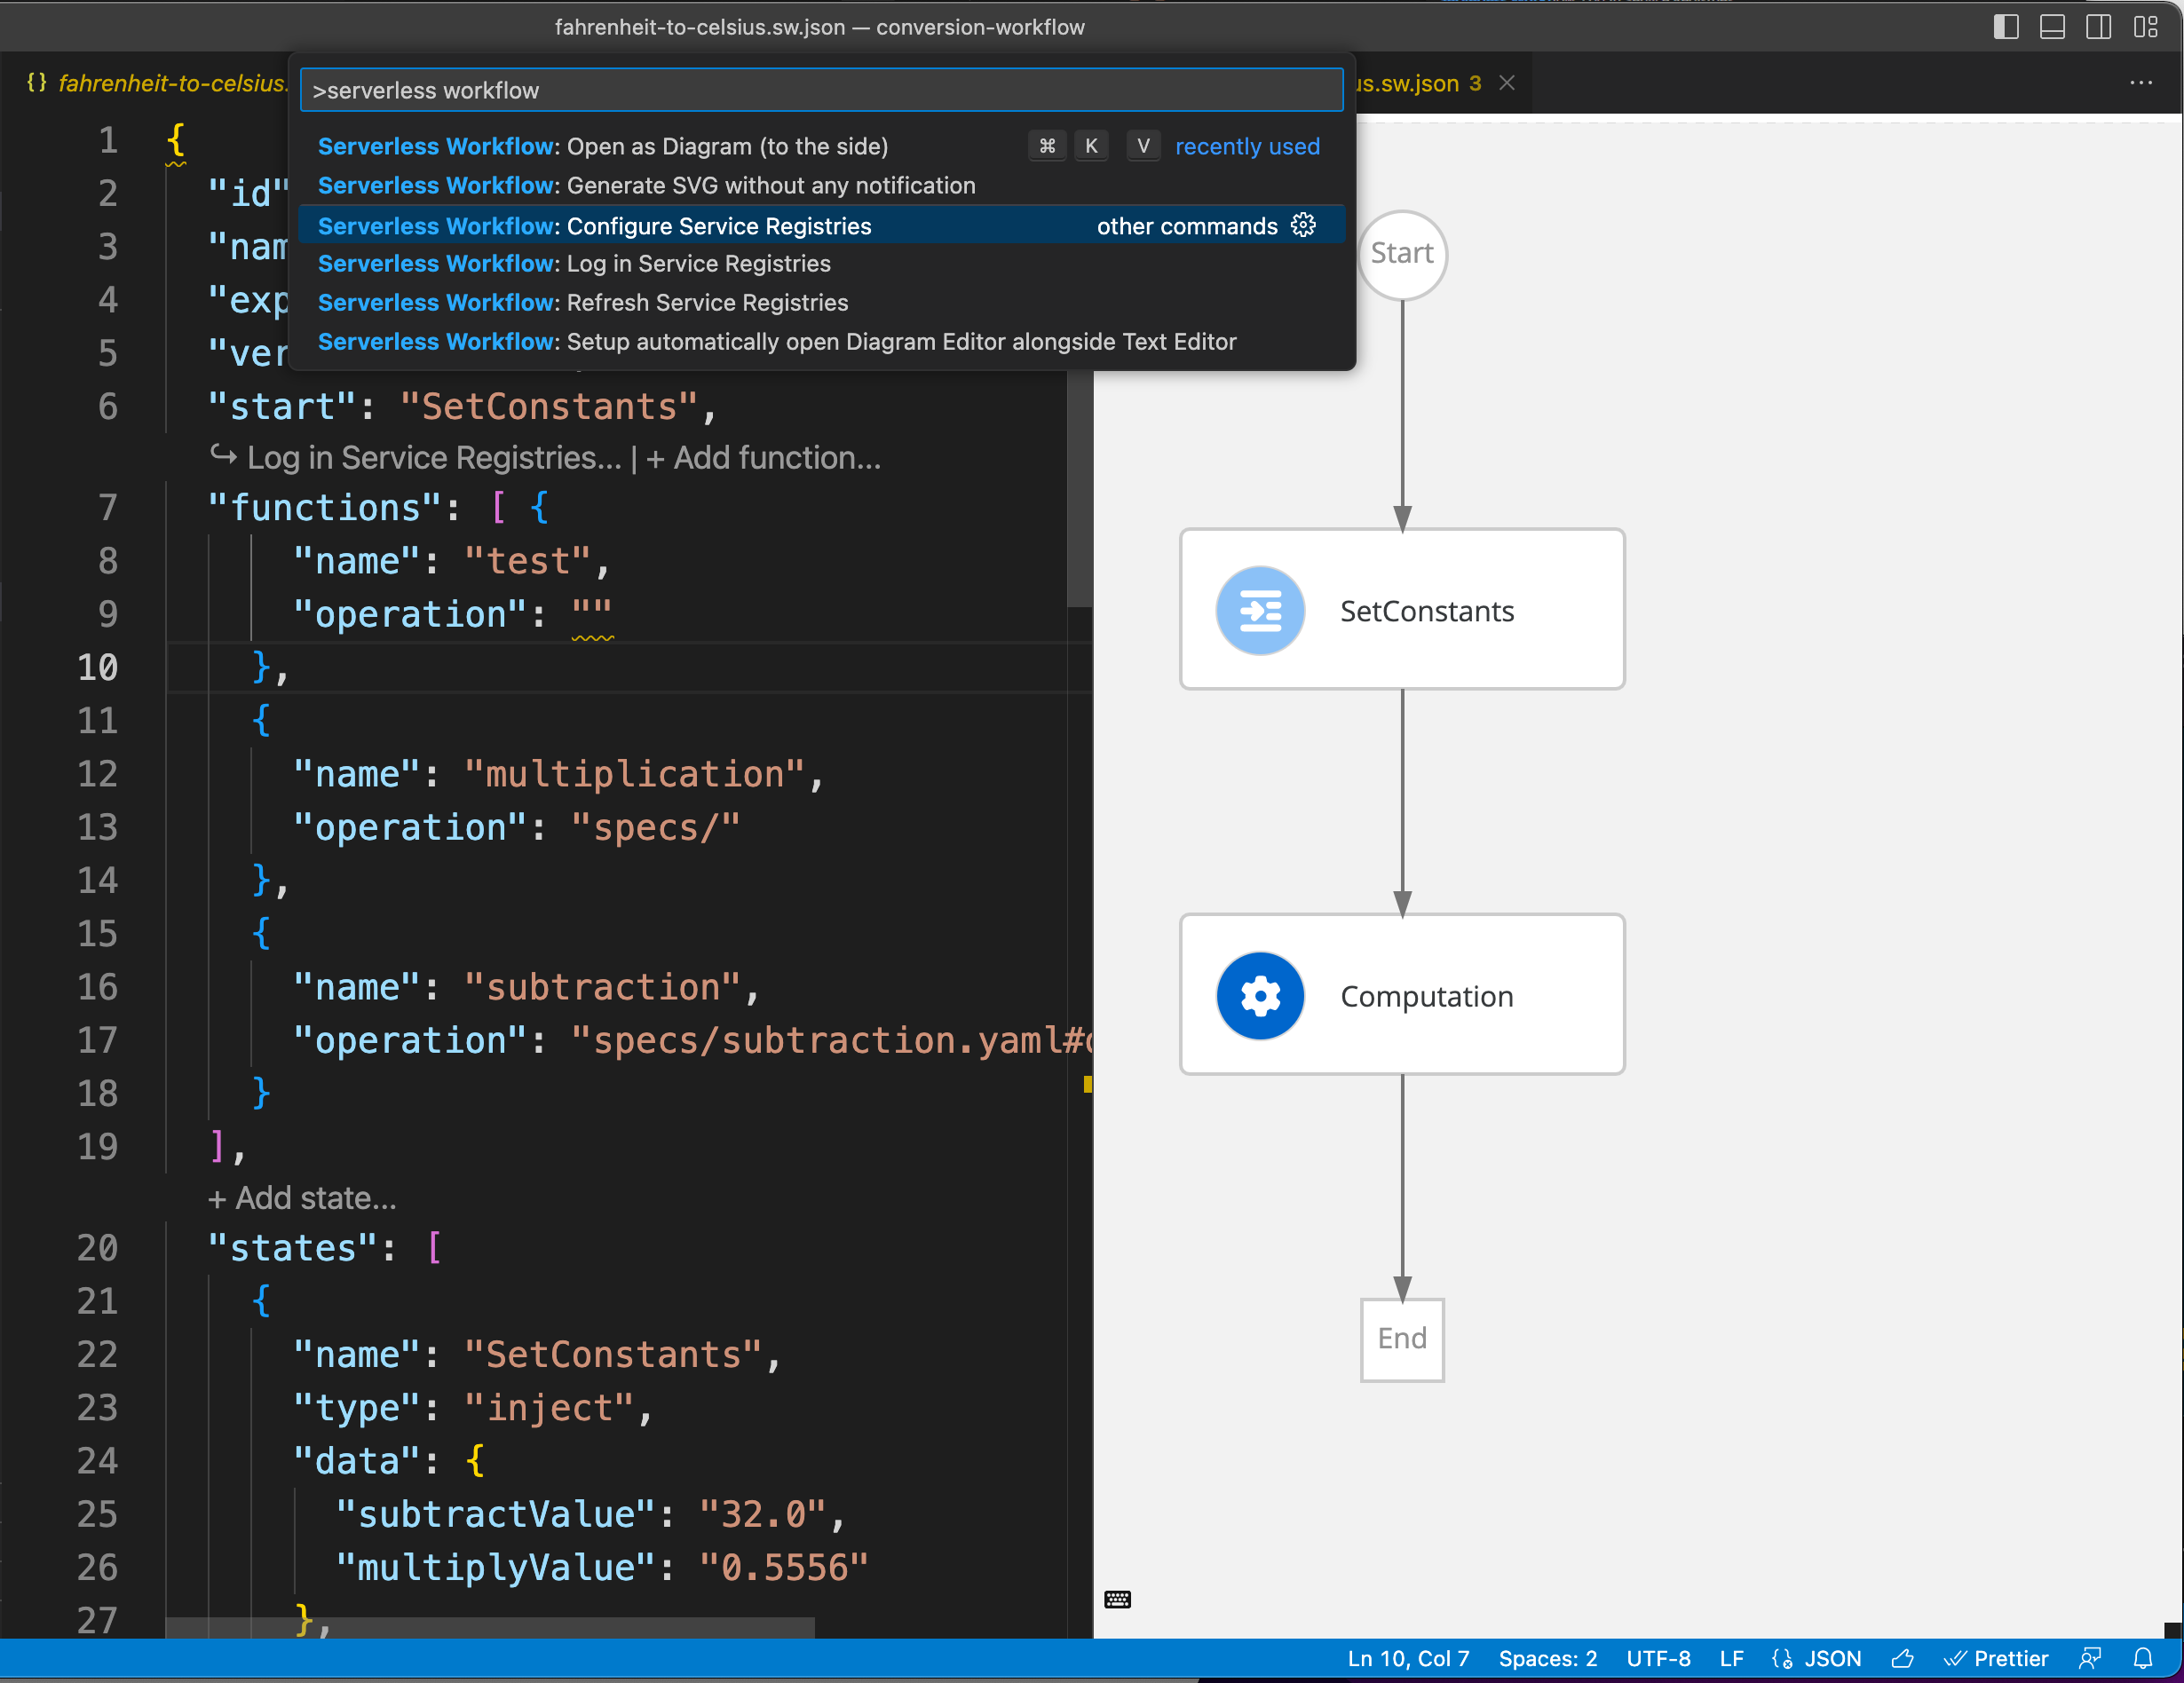
The VS Code extension for Serverless Workflow editor supports the following commands:
| Command | Description |
|---|---|
Serverless Workflow: Generate SVG without any notification |
Generates an SVG file of a workflow diagram in the workspace next to the workflow file. |
Serverless Workflow: Open as Diagram (to the side) |
Opens the workflow diagram to the right side of the editor. |
Serverless Workflow: Setup automatically open Diagram Editor alongside Text Editor |
Allows you to set whether or not a workflow diagram needs to be opened by default alongside the editor. This operation provides two options, including Open automatically and Do not open. |
Serverless Workflow: Configure Service Registries |
Opens the service registries configurations on the Extension Settings page. |
Serverless Workflow: Refresh Service Registries |
Refreshes the artifact list of service registries. |
Serverless Workflow: Log in Service Registries |
Triggers a login action of service registries. |
To trigger a command in VS Code, go to View → Command Palette… or you can press Ctrl+Shift+P to open the command palette. Enter Serverless Workflow in the search tab to see the list of supported commands.
Serverless Workflow editor settings
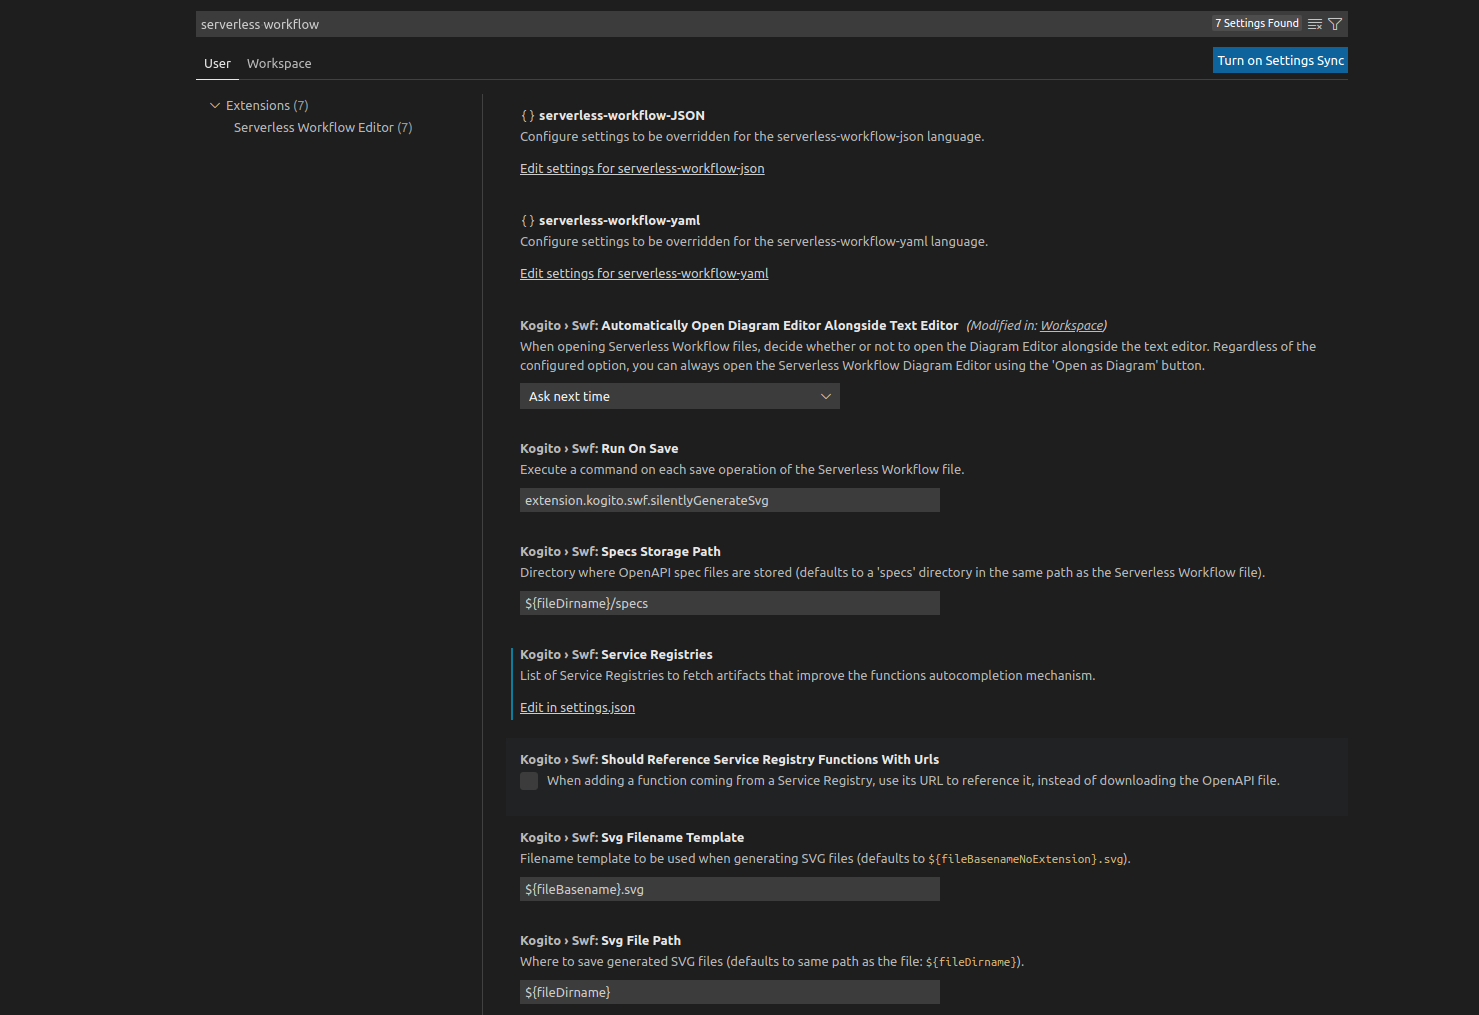
You can navigate to File → Preferences → Settings and configure the following settings for the Serverless Workflow editor:
| Setting | Description |
|---|---|
Automatically Open Diagram Editor Alongside Text Editor |
This setting enables the editor to open a workflow diagram when a workflow is being edited. The available options include:
|
Run On Save |
This setting executes a VS Code command when you save an edited workflow file. The default VS Code command that is executed is |
Service Registries |
This setting provides access to the configuration of service registries in the |
Should Reference Service Registry Functions With Urls |
When automatically completing the functions in the service registry, this setting specifies whether a function operation uses the URL of OpenAPI specification file or uses the local path, where the file is downloaded (Specs Storage Path). |
Specs Storage Path |
This setting enables you to define or edit the path of OpenAPI specification file. The default value is |
Svg Filename Template |
This setting enables you to set a file name template, which can be used while generating the diagram SVG file. The default value is |
Svg File Path |
This setting enables you to set a path, where the generated diagram SVG file will be stored. |
Enabling VS Code extension to load OpenAPI files from remote service registries
The VS Code extension for Serverless Workflow editor can use OpenAPI specification files that are stored locally in the specs folder. Also, the OpenAPI specification files can be stored in remote service registries, providing auto-complete feature for function definitions.
For more information about OpenAPI specification files path, see Serverless Workflow editor settings.
The VS Code extension configures a list of service registries, which enables the Serverless Workflow editor to load OpenAPI specification files that are stored in the external registries.
-
VS Code extension for the Serverless Workflow editor is installed.
For more information about installing the VS Code extension, see Installing the VS Code Extension for Serverless Workflow editor.
-
Open your workflow file in VS Code IDE and select the Setup Service Registries option.
-
Navigate to the
settings.jsonfile. -
Add the list of service registries in the
settings.jsonfile using thekogito.swf.serviceRegistrieskey, which matches the following JSON schema:Service Registry Schema{ "type": "object", "properties": { "registries": { "type": "array", "items": { "type": "object", "properties": { "name": { "type": "string" }, (1) "url": { (2) "type": "string", "format": "uri", "pattern": "^https?://?[-A-Za-z0-9+&@#/%?=_!:.]+[-A-Za-z0-9+&@#/%=~_|]" }, "authProvider": { (3) "type": "string", "enum": ["none", "red-hat-account"], "default": "none" } }, "required": ["name", "url", "authProvider"] } } } }In the registries array, each item must contain the following properties:
1 name: Identifier provided for a registry. 2 url: URL for the REST API of the remotes service registry, such as Apicurio registry. 3 authProvider: Type of authentication for the remote service registry. This property contains values as none (no authentication) and red-hat-account (log in with your Red Hat account). Following is an example of a service registry configuration:
Example of service registry configuration{ "kogito.swf.serviceRegistries": { "registries": [ { "name": "openshift", "url": "https://{url-to-openshift-registry}/apis/registry/v2", "authProvider": "red-hat-account" }, { "name": "local", "url": "https://{url-to-local-registry}/apis/registry/v2", "authProvider": "none" }, ] } }To access the service registry settings in the VS Code, click on the Setup Service Registries option and use the Serverless Workflow: Configure Service Registries command.
Using service registries for auto-completion
You can use the service registries for auto-completion feature in the Serverless Workflow VS Code extension.
The following prerequisites are for the service registries that require Red Hat authentication:
-
You have a Red Hat account with access to Red Hat Hybrid Cloud Console.
-
Red Hat authentication extension is installed.
-
In a workflow file, click the Setup Service Registries options and navigate to the
settings.jsonfile to configure the service registries.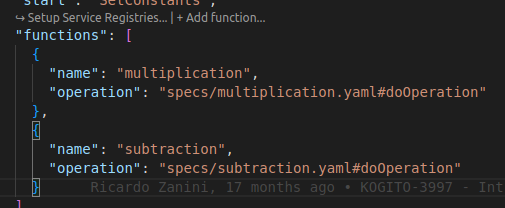 Figure 9. Function definition section with Setup Service Registries option
Once you configure the service registry settings, the function definition section in the workflow file displays a Log in Service Registries button.
The Log in Service Registries button appears when the function definition is configured to a remote service registry, such as Apicurio registry.
-
Click on the Log in Service Registries option.
You are redirected to the Red Hat login (SSO) page.
-
Log in with your Red Hat credentials to connect to the remote service registry.
You are redirected to the Red Hat login (SSO) page only if the authProvider property contains the value of
red-hat-accountin the service registry settings.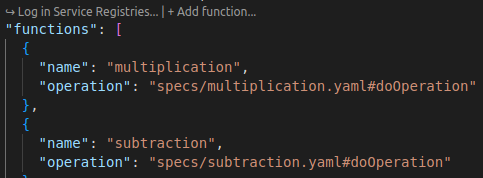 Figure 10. Function definition section with Log in Service Registries option
 -
After logging in, use Ctrl+Space in the function definition section to view the list of available functions.
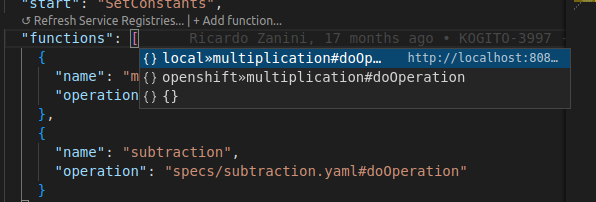 Figure 11. Example of function definition section auto-complete dialog box
 -
Click on a function to auto-complete the function definition as shown in the following example:
 Figure 12. Example of an auto-completed function definition
After selecting an option in the auto-complete dialog box, the OpenAPI specification file is downloaded into the
specsfolder. The downloaded OpenAPI specification file follows the REGISTRY-NAME_OPERATION-NAME_VERSION format.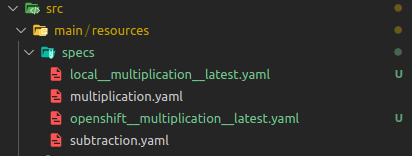 Figure 13. Downloaded OpenAPI specification file
 -
To fetch the new changes in the service registry, click Refresh Service Registries.
 Figure 14. Refresh Service Registries button in function definition section
 -
To create a new function definition object, click Add function.
-
You can also validate the auto-completion using the JSON schema to the workflow file structure.
The Serverless Workflow editor performs validation using JSON schema to the workflow file structure but not the values, and auto-completion works with JSON but not with YAML.
To view the validation warnings and errors, go to View → Problems or press Ctrl+Shift+M to open the Problems tab.
 Figure 15. Errors and warnings in Problems tab
Found an issue?
If you find an issue or any misleading information, please feel free to report it here. We really appreciate it!